Open Source Extras SimpleAB A/B Testing Chunks
Using SimpleAB you can easily (and completely transparent to the user) test different chunks in your MODX Revolution site. Setting up a new test is easy, which we will demonstrate in this tutorial.
For setting up Chunk testing, you need access to the templates or parts of the MODX system where the Chunk is being referenced, and knowledge of how chunks and MODX tags work is really useful. If you do not have this access or knowledge, please consult your developer.
Setting up Chunks to Test
To A/B test Chunks, we’ll need some chunks. In this example we will test a Call-to-Action chunk, which contains nothing more than a button, and we have created several variations with different colors and text.
For this tutorial and quickly getting started, we’d suggest you do something similar, just duplicate a chunk and change things that stand out.
Creating the new Test
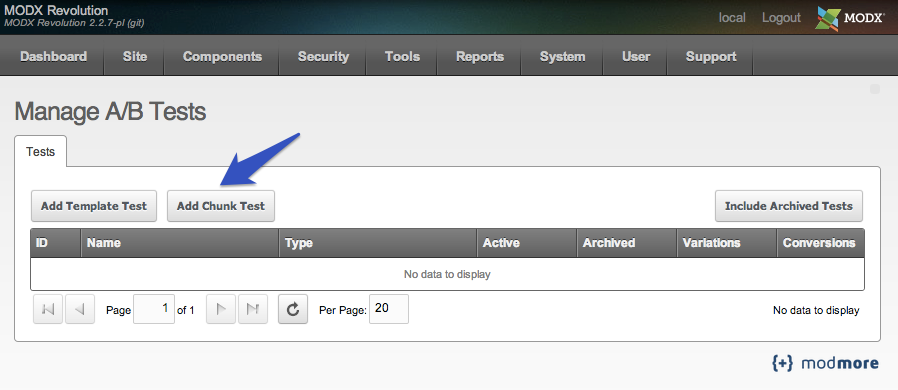
To create the test, make sure SimpleAB is installed and head over to Components > A/B Testing in the top menu.
1. Open the Component
In the Component you’ll see the Tests grid which lists all your tests, and some important numbers like amount of variations and a conversions count. It might be very empty now (or have a Template test from [the other tutorial](Testing Templates)), so let’s go ahead and create a new test.
You can already see the two different types of tests in SimpleAB: Template and Chunk. While the process is quite similar, you can find a tutorial on setting up a Template A/B Test here.
This tutorial focuses on Chunk tests, so go ahead and click the button that says Add Chunk Test.
2. Create the Test
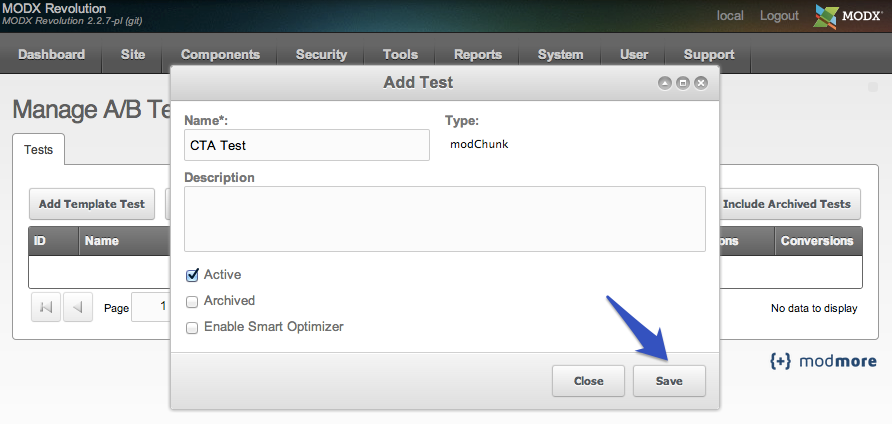
After clicking the Add Chunk Test button, you will see a popup window allowing you to configure the chunk test. If you followed the A/B Testing Templates tutorial as well, you will notice it is fairly similar and has less fields. Fill in the different fields.
- Name • Required. Make it descriptive (or creative!); the name is your own reference for the Test. In this example, we labelled it CTA Test as we are testing Call-to-Action buttons.
- Type • Prefilled and unchangeable, the Type indicates on what object the test applies. As we’re making a Chunk test, this is set to modChunk.
- Description • Optional. Just a reference for yourself of what a test tries to accomplish. Great to communicate the test and variations quickly to team members.
- Active • Tick this box to make the Test active. In the case of a Chunk test, we still need to call it in our templates to actually run it, however we will get to that in a bit.
- Archived • When your test is complete, you can archive it to keep the data in the database, but to hide it in the main Tests grid. You can use the button “Include Archived Tests” in the grid toolbar to toggle visibility of archived tests.
- Enable Auto Optimizer • Please refer to the Auto Optimizer tutorial for more information on how to use this feature. In this tutorial, we will not use it.
After filling in the test, hit the Save button to store the test in the database.
3. Managing the Test
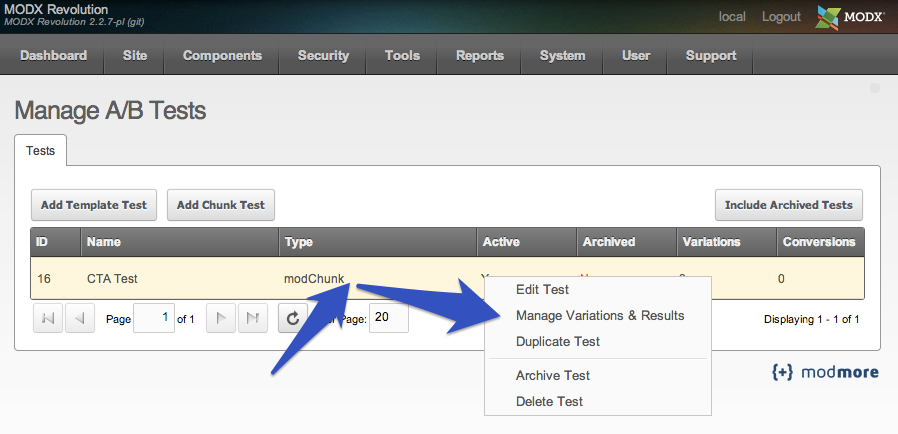
Next we’ll need to add the variations in order to make it, like, return a variation in the test. Back in the Tests grid, right click the newly created Test (it’s ID 16 here, but likely ID 1 or 2 for you). You’ll see a bunch of things you can do with the test. These options are the same as the options available when using a Template test
- Edit Test • This menu item will bring back the popup window we just used to create the test, allowing us to change any of its details from step 2.
- Manage Variations & Results • This menu item will bring you to a separate view where you can manage the variations for this specific test, and also lets you view statistics on the test. Some options are only available in this view. We’ll go there in a minute.
- Duplicate Test • If you click this menu item, you will be presented with a new popup window asking for a new name and if you want to copy along performance data. This is incredibly useful if you want to run a slightly different test.
- Archive Test or Unarchive Test • Depending on the state of the Test, this lets you quickly archive or unarchive a test. Note that in order for a test to be working, it needs to be both active and not archived.
- Delete Test • Use this to remove the test (and all its data) completely.
Note: when doing this, all data will be written to an export XML file in your core/cache/simpleab/backups/ folder just in case. This export file will work with ImportX 2.0 (planned for late 2013), however until that is released, you cannot restore the test.
Go ahead and choose Manage Variations & Results so we can add some variations.
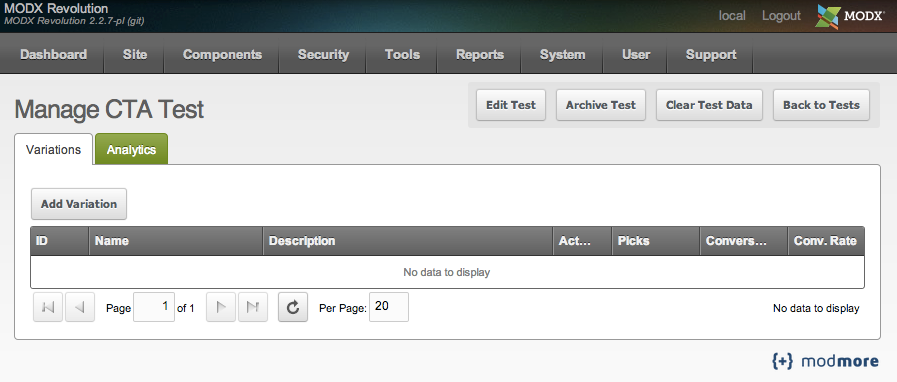
4. The Manage Variations & Results view
In this test-specific view, you will find two tabs (screenshot follows below): Variations and Analytics. Let’s focus on the variations tab as there are no stats to look at yet. First look at the 4 actions in the buttons bar on top.
- Edit Test • When hitting the Edit Test button, the same popup we saw before (in step 2) appears, allowing you to customize when the test runs and to change its name and stuff like that.
- Archive Test • The ability to archive a test is also available from the Tests grid, but is also available here.
- Clear Test Data • If you want to reset a test, you can use the Clear Test Data button to get rid of Conversions, Picks and even Variations from here.
Note: when doing this, all data will be written to an export XML file in your core/cache/simpleab/backups/ folder just in case. This export file will work with ImportX 2.0 (planned for late 2013), however until that is released, you cannot restore the data. - Back to Tests • This button brings you back to the homepage of the component with the Tests grid.
In the Variations tab, we will find a grid with the various variations for this test, and a couple of useful (all-time) metrics for each of them. But we don’t have any variations yet, so let’s change that..
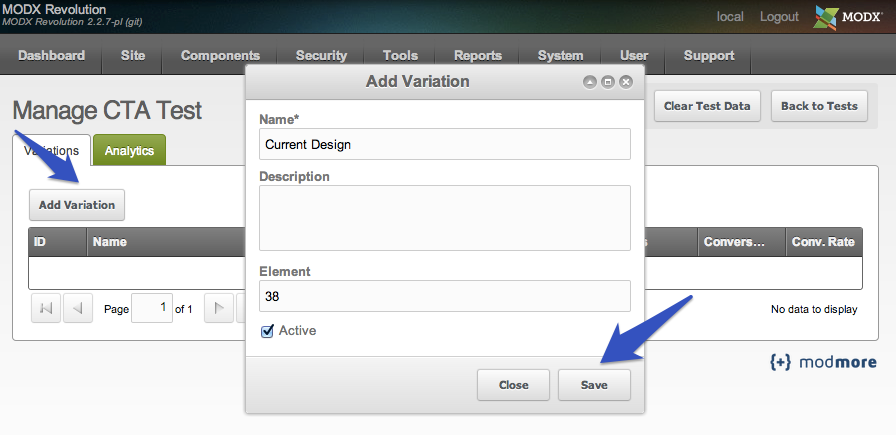
5. Adding & Managing Variations
Hit the Add Variation button in the grid toolbar to create a new variations. You will see a couple of fields appear in a new modal window.
- Name • Required. The name for the variation. This does not have to be the name of a chunk, but it may be useful to give this something that describes the variation. The first variation we’re adding is the current (baseline) design, so we name our variation “Current Design”.
- Description • Optional. If you want to, you can provide a further description of the variation here.
- Element • Required. This is where we assign the chunk we want this variation to use. In version 0.3.1 (pre-release), this expects the ID of a chunk, not the name of a chunk. This should be made more user friendly before launch.
- Active • Use the Active toggle to enable or disable variations within a test. Only active variations will be used as alternatives in the test, so be sure to enable it.
Once you filled in the Variation fields, hit Save, and repeat the process for as many variation as you want to include in the test. We have a total of 3 .
6. Call the Test in your Template
Now in order to actually start running the test, we need to place a simple snippet tag into our template (or where-ever we need one of the variations to show up).
The snippet is called SimpleAB (bet you didn’t see that coming!) and only needs a single property, which is &test. Assuming our test has an ID of 16 in the component, this is how we would reference it where we want our Call to Action button to show up:
[[!SimpleAB? &test=`16`]]
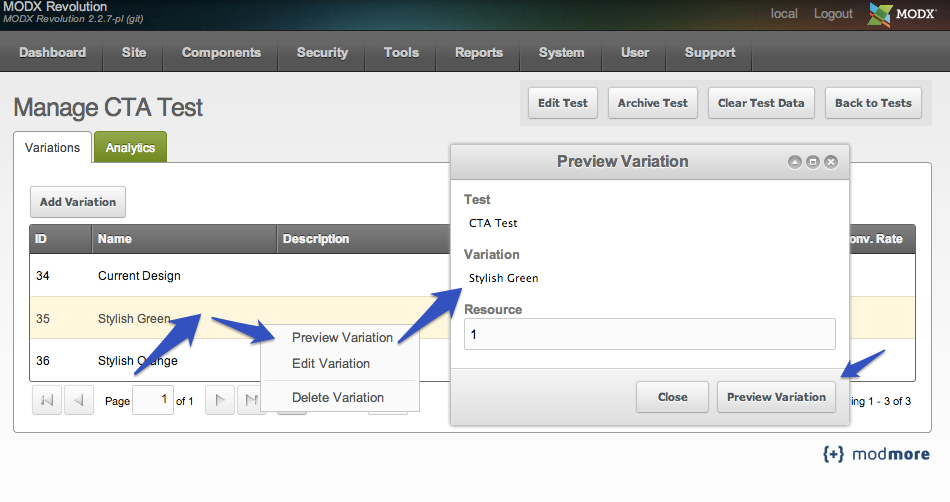
7. Preview the Test Variations
Now that we’ve got the Variations set up and placed the snippet call, we can use the preview functionality to see how it works.
Right click the variation you would like to view, and choose for the Preview Variation menu item. You will see a new modal, providing you with a summary of what you are going to see (what test and what variation) and an input field where you need to define the Resource ID to run the test on. Obviously, the Resource you want to run the preview on needs to reference the SimpleAB Snippet at some point.
Fill in the Resource ID (just one, please) and hit the Preview Variation button. It will briefly talk with the server to get the proper url, and then attempt to open a window or tab in your browser with the test. As many browsers include popup blockers and in tests have been doing their job well, it will also come back with a quick window with the link.
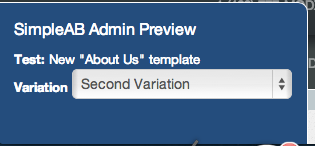
Previewing a test should give you a nice “SimpleAB Admin Preview” box in the bottom left of the screen. It shows you the name of the test you are previewing, as well as a dropdown so you can easily switch to a different variation.
8. Set up Conversions
You’ll need to log conversions if you want to calculate a conversion rate, so let’s do that. As setting up Conversion points is the same for both Chunk and Template tests, please view the tutorial on setting up conversions.
9. Let data pour in…
Now it’s the time to get a refill for that empty cup. Depending on how many visits your site gets, it may take a few hours to a few weeks to get some reliable data.