Commerce Commerce 1.x Payments & Gateways Adyen (HPP)
The Adyen (HPP) payment gateway ships with Gateway Pack 1 and offers the hosted payment page checkout option for Adyen. Adyen offers tons of different payment options, including lots of local or regional options.
The gateway integrates with the hosted payment page offered by Adyen, allowing you to use any of their payment options from a single integration. For styling of those pages, you can configure Skins in the adyen dashboard.
Table of Contents
Creating the Payment Method
First make sure you have Gateway Pack 1 installed. This is a free package available from modmore.com. After installation, to to Configuration > Modules in the Commerce dashboard, and enable the GatewayPack1 module.
Next, navigate to Configuration > Payment Methods. Click the Add a Payment Method button and choose Adyen in the Gateway dropdown. Fill in the other fields and save.
After having saved the payment method, you’ll get access to the Gateway Options for Adyen. These are:
- Merchant Account
- Secret
- Skin Code
The value for each of these options can be found in the Adyen dashboard under Skins, when editing the skin you’d like to use.
Locating your Credentials
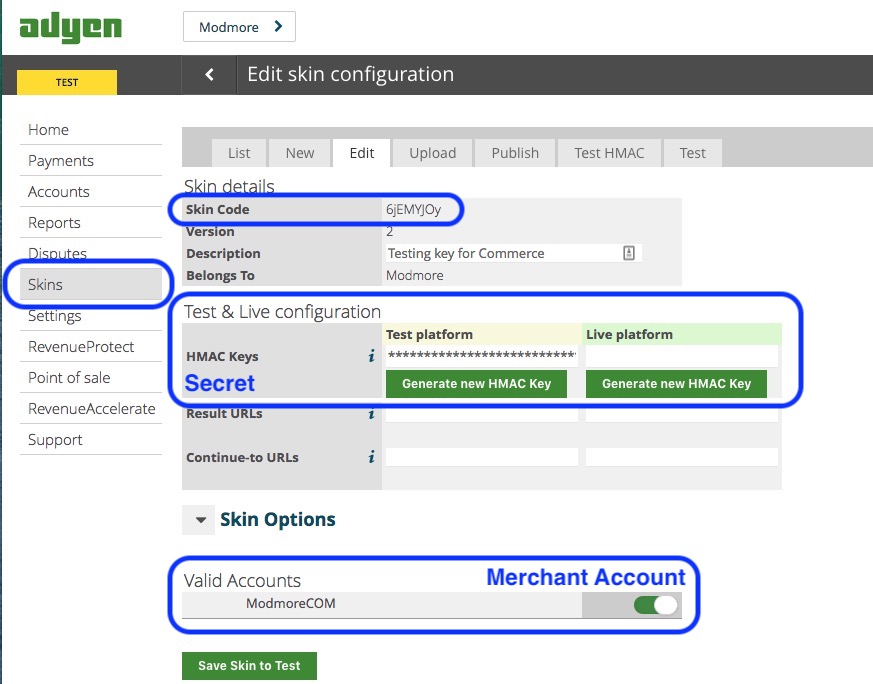
Use the HMAC key (secret) for the mode you’re trying to use. The Result URL and Continue-to URL will be set per-transaction by Commerce so you can leave those empty in your Skin configuration.
You’ll likely need to create two payment methods; one for testing using your test credentials, and one for live with the live credentials. Set the availability appropriately.
Using Notifications
As of v1.1 of the Gateways Pack, the Adyen integration also supports Notifications. These don’t really do anything, but are required by Adyen to be listened to. Optionally, the notifications can be configured to also affect the order status (i.e., if a payment is marked as paid from the notifications but not from the customer).
To configure notifications, go to Account > Server Communication in the Adyen control panel. In the table of notifications, click Add after Standard Notification and configure the following:
- Set the URL to
https://yoursite.com/assets/components/commerce_gatewayspack1/adyen_notifications.php, replacing yoursite.com with the actual URL. - Tick the box for “Active”
- Set the Method to “JSON”
- Make sure the right merchant account(s) is/are enabled under “Merchant Accounts”
- Under “Additional Settings”, click the button to “Generate new HMAC key”, and copy the generated key into your payment method in Commerce in the “Notifications HMAC Key” field. While you can enable various includes, those are not currently used by the gateway.
- Under “Test Notifications”, enable “Authorisation”. That’s the only notification we currently listen to. Click “Test Configuration” and the notifications should be accepted.
Updating order status with notifications
By default, Notifications only log to core/cache/logs/adyen_notifications.log and no additional processing (i.e. marking an order as paid) is performed. This is because the order is not processed the same way when received via notifications compared to through the checkout. We hope to address that in the future.
You can set the commerce_gatewayspack1.adyen.handle_via_auth system setting to 1 to allow the Gateway integration to use Notifications to trigger the order/transaction being marked as paid. This does not currently trigger the \Commerce::EVENT_ORDER_PAYMENT_RECEIVED event because it bypasses the regular processing, which may mean certain modules do not work as expected when this setting is enabled.
Note on notifications and multiple gateways
Commerce will use the Notifications HMAC Key for the Adyen gateway that is enabled in the current mode. You may need a different one for live and test, but make sure you don’t have multiple gateways per mode.